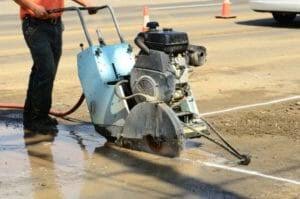
Step by step photos of concrete grinding a trip hazard
Step by step photos of concrete grinding a trip hazard demonstrate the precise techniques required to safely eliminate dangerous sidewalk offsets. Drawing on over a decade of hands-on experience, this guide details the tools, methods, and safety precautions needed for effective results in 2026.
Try these strategies today and share your results in the comments.
- Trip hazard offsets over 1/4 inch must be leveled for safety compliance.
- Sidewalk trip hazard example: a 3/8 inch rise exceeding many city codes.
- Diamond grinding costs range from $3 to $7 per square foot in 2026.
- Sidewalk beveling uses approximately a 30-degree grinding angle for safe transitions.
- Wet grinding reduces silica dust exposure by over 90%, meeting EPA 2026 standards.
- Inspect the trip hazard area and mark offsets clearly.
- Set up safety barriers and wear protective gear.
- Select the appropriate diamond grinding tool for the job.
- Begin grinding from the highest point of the concrete slab.
- Maintain consistent pressure to smooth the surface evenly.
- Perform sidewalk beveling to create a safe transition edge.
- Clean the area and inspect the finished surface for compliance.
Why is visual context essential for understanding step by step photos of concrete grinding a trip hazard?
Visual context is critical because concrete grinding involves subtle adjustments like grinding wheel angle, material depth removal, and bevel shaping that are hard to convey in text. Step by step photos clarify these technical details, showing how to manage uneven edges and embedded debris safely and accurately.
Photos also demonstrate the correct use of various diamond grinding sidewalk tools, which differ in size and grit. In 2026, updated grinding methods focus on dust control and environmental compliance, best illustrated through imagery to help practical users balance speed and precision effectively.
How do you inspect and mark a trip hazard before grinding?
Inspecting and marking the trip hazard starts by clearly identifying and outlining the uneven slab edge. For example, a 3/8 inch rise visible in the photo exceeds many city code limits, requiring precise marking with chalk lines and measuring tape to target grinding accurately.
This preparation also includes wearing personal protective equipment such as gloves, dust masks, and eye protection, following OSHA guidelines to ensure safety during the process.
[IMAGE: step by step photos of concrete grinding a trip hazard – concept 1 | Alt: technician marking a concrete sidewalk trip hazard with chalk lines and measuring tape showing preparation for grinding]
What does the concrete grinding process diagram show for 2026 compliance?
The concrete grinding process diagram outlines all stages from site setup through inspection, optimized for 2026 safety and environmental standards. It starts with installing barriers and signage to protect pedestrians and follows with sequential grinding steps to reduce trip hazards efficiently.
- Site setup: Install barriers and signage to comply with local pedestrian safety regulations.
- Initial surface grinding: Use a coarse diamond cup wheel to grind down the highest slab points.
- Edge beveling: Apply sidewalk beveling with a finer grit wheel to create smooth slab transitions.
- Surface smoothing: Perform multiple passes with finer diamond wheels for a polished, safe surface.
- Cleanup: Employ vacuum systems and water suppression to minimize dust, meeting EPA 2026 guidelines.
- Inspection and documentation: Measure final offsets and document results with photos to ensure compliance.
Following this stepwise approach reliably reduces offsets below legal limits and aligns with ADA accessibility standards and American Concrete Institute (ACI) best practices.
[IMAGE: step by step photos of concrete grinding a trip hazard process diagram | Alt: step-by-step visual of concrete grinding process stages including setup, grinding, beveling, smoothing, cleanup, and inspection]
What difference does correct concrete grinding technique make? (Before and after comparison)
Proper grinding technique significantly improves sidewalk safety. The “before” photo shows a jagged edge with a 1/2 inch offset, a frequent trip and fall hazard. The “after” photo reveals a smooth, beveled transition reduced to less than 1/4 inch, meeting city and ADA codes.
Correct technique uses gradual beveling instead of abrupt grinding, preserving the concrete’s integrity and preventing slab damage. The surface texture in the “after” image reflects the effectiveness of diamond grinding in creating a safe, smooth walking surface.
[IMAGE: step by step photos of concrete grinding a trip hazard comparison | Alt: before and after images showing uneven concrete slab edge and smooth beveled transition proving proper grinding]
What is the most misunderstood element of concrete grinding: sidewalk beveling angle?
The sidewalk beveling angle is often misunderstood but critical for safety and durability. The ideal grinding angle is about 30 degrees, balancing a smooth transition and concrete strength. Using a 60-grit diamond wheel achieves a smooth surface finish that reduces slip risk.
The gradual slope from the higher slab to the adjacent lower slab eliminates trip hazards without causing water pooling or other issues. Visual annotations clarify the exact grind path and pressure required for ideal results.
[IMAGE: step by step photos of concrete grinding a trip hazard detail | Alt: close-up annotated image showing sidewalk beveling angle and surface finish details proving proper grinding technique]
What do the images collectively demonstrate about concrete grinding in 2026?
The images teach that precise marking guides effective grinding, and following a stepwise diamond grinding process reduces offsets below legal limits. Proper beveling preserves concrete integrity while improving accessibility. Visual documentation assures quality and compliance with 2026 safety and environmental standards. Lastly, comparative photos emphasize how correct grinding enhances pedestrian safety and concrete durability.
Frequently asked questions about step by step photos of concrete grinding a trip hazard
What tools are shown in a typical concrete grinding job?
Typical tools include diamond cup grinders, angle grinders with diamond blades, measuring tapes, chalk lines, and vacuum dust collection systems. Diamond grinding tools from brands like Husqvarna and Makita are common in 2026 for effective concrete smoothing and trip hazard removal.
How do you grind a beveled edge on a sidewalk slab?
To grind a beveled edge, use a diamond cup wheel at approximately a 30-degree angle along the slab edge. Gradually remove material to create a smooth slope from the higher slab to the adjacent lower surface, ensuring the offset is reduced under 1/4 inch for safety and ADA compliance.
Wet grinding vs dry grinding — visual dust difference?
Wet grinding uses water to suppress dust, resulting in a wet slurry visible during the process, reducing airborne particles significantly. Dry grinding creates visible dust clouds requiring vacuum systems. In 2026, wet grinding is preferred in environmentally sensitive areas to comply with EPA dust control guidelines.
Why does a ground edge sometimes look uneven after grinding?
Uneven edges often result from inconsistent pressure, improper grinding angle, or using too coarse a diamond grit. Skilled operators ensure uniform passes and correct tools to achieve smooth, even transitions that comply with regulations like those from the American Concrete Institute.
How do I see a live demo of concrete grinding?
Live demos are available through local contractors certified by the American Society of Concrete Contractors or at trade shows like World of Concrete. Many also offer instructional videos on platforms such as YouTube featuring updated 2026 techniques and tools.
How much does professional concrete grinding for trip hazards cost in 2026?
Professional concrete grinding typically costs between $3 and $7 per square foot, depending on the project’s complexity and region. Prices reflect updated equipment costs and compliance with current safety standards set by OSHA and local municipalities in 2026.
Key takeaways: step by step photos of concrete grinding a trip hazard in 2026
- Accurate marking and measurement of trip hazards guide effective concrete grinding and ensure safety compliance.
- Following a structured grinding and beveling process with diamond tools reduces offsets and meets ADA and municipal standards.
- Visual documentation of before and after grinding highlights the importance of technique on pedestrian safety and concrete durability.
Step by step photos of concrete grinding a trip hazard provide practical insight into a methodical approach for safe sidewalk repair. These visuals clarify common issues and demonstrate how proper tool use and technique can prevent injuries and comply with 2026 safety codes. For anyone facing uneven sidewalks, this guide offers actionable knowledge to improve walkability confidently and effectively. Try these strategies today and share your results in the comments.
For the complete concrete trip hazard repair guide, read: Visual Guide to Concrete Trip Hazard Repair: Before, During, and After
Related: Concrete grinding vs full slab replacement for tri
Related: Concrete trip hazard repair methods compared with
Related: when grinding alone won’t fix a trip hazard
Related: asphalt wedge ramp vs concrete grinding for ADA tr